
I don’t make long exposure photos in the daylight often. The reason is, that I don’t feel like hauling filters around. I made a filter holder a while ago, which holds a welding glass, but I have since found out that it has a few quirks. The glass unfortunately has a few imperfections, which do show in most circumstances. The last time I used it was for Heavy on the Mind and Soul project and while it did work.
Then the other month, as I was doing some research for something completely different, I stumbled upon couple of ways of doing long exposures in the day time without the need for an ND filter (Neutral Density filter is a filter which effectively dims down or blocks certain amount of light coming into the camera). So the way it’s done, is that you digitally merge or average the photos of shorter exposures, thus effectively creating a long exposure photo. The cool thing about such process is, that you can have more play room in the digital dark-room as you would with “the ND process”. Especially if you don’t do your math correctly and make too many photos, you could just as well decide to use less for a different effect.
Let me show you what I mean. Bellow you can two photos. Don’t mind that one is out of focus. What you can notice is that the one with silkier water isn’t silky enough, but is already blowing out the highlights. I could stop it down more by making the aperture smaller, say F16, but I didn’t want that. I wanted the trees in the back blurry. The only way of doing that is by having an aperture almost wide open, which in this case was 3,5. While there was still some clipping in the highlights at F3,5 @ 1/60s with ISO 100, it wasn’t nearly as bad as when it was taken at 1s.


So. How do we make a longer exposure, to at least mimic or do better than the one at 1s without clipping and without an ND filter? Multiple exposures and we’ll average them in post (I know some cameras have this option in the system already, but I didn’t feel like paying almost 5$ for an app for my Sony A6000 to do what I can do in Photoshop). I didn’t feel like doing math when taking photos, but it’s not that difficult. The easiest to explain it is with 1 second exposures. Let’s say you want to make a 30 sec. exposure, but the maximum you can is 1 second, then make 30 photos 1 second long. The same principle applies for other possible exposures. Do note, however, that you’ll need a lot of computer’s horse power to average all those images, especially if you shoot in RAW. It took me an hour or so to make one with about 25 exposures. Also be mindful when taking photos, that you use a tripod. Although you could use Align feature in Photoshop, and it’s good that you do even if you shoot with tripod (especially if it’s small like my Gorillapod tripod was in this instance), the risk of mistakes with mis-alignment is bigger when handheld.
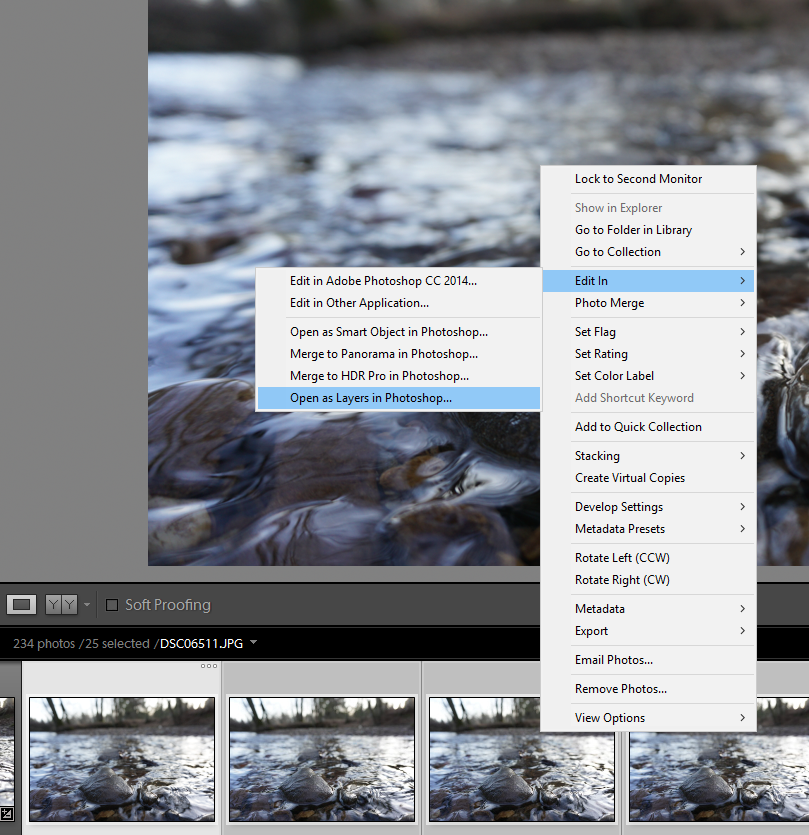
So this is how we’re going to do it. If you work with Lightroom then select a number of exposures you want to edit, in our case 25 exposures, rightclick on selection, go Edit in>Open as Layers in Photoshop and wait while Photoshop loads the files. It might take a minute or two, depending on size and type of the photos and the number thereof.
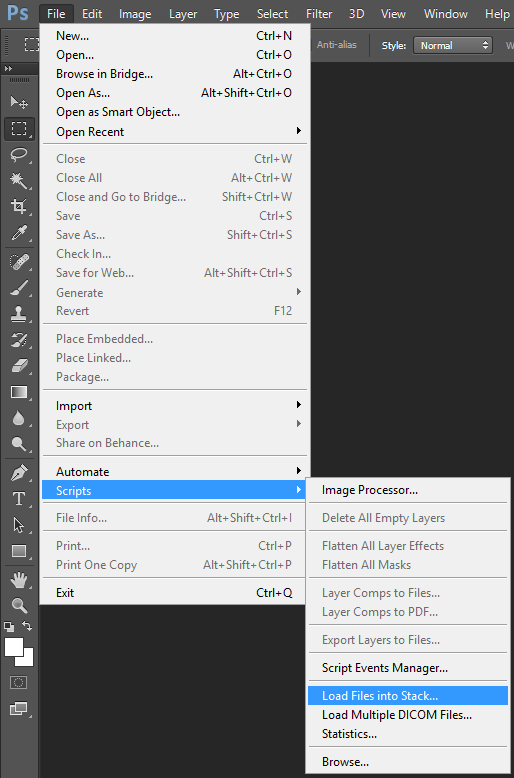
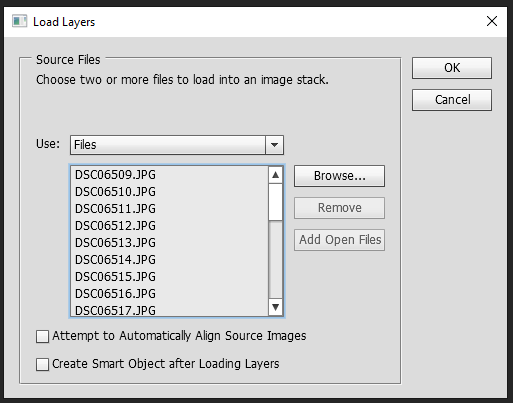
If you don’t use Lightroom, Load your images directly into Photoshop by clicking through File>Scripts>Load Files into Stack. The window will open, which will prompt you to select the files or a folder, whichever you prefer. If you wish, you may already make Photoshop attempt aligning the photos by selecting Attempt to Automatically Align Source Images. We will do so later, so that the process upon loading images is the same for both scenarios (whether you use Lightroom with Photoshop or Photoshop only).
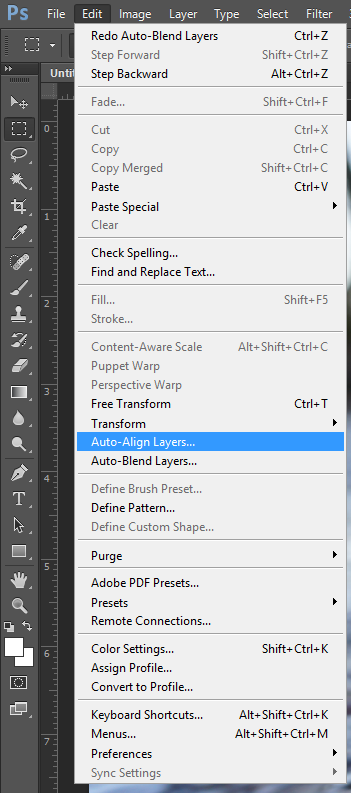
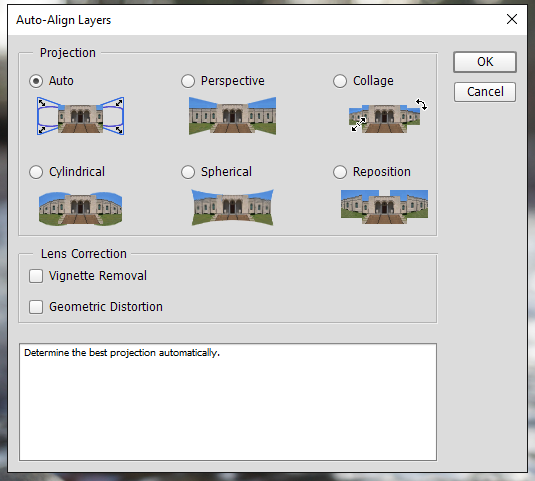
When all the photos are loaded as layers in Photoshop we will have to align the photos. We’ll do this by selecting all layers, then we’ll head to Edit>Auto Align Layers and select Auto (since we’re not doing anything fancy like a panorama, this will suffice; also, Auto usually tends to make a relatively good job at knowing what you’re after). Should Autoalign reveal that the tripod has moved, use Crop tool to crop it out or crop it later on in Lightroom.
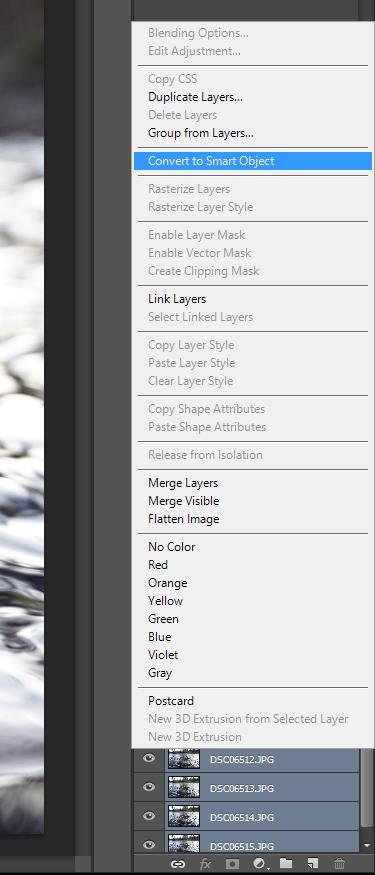
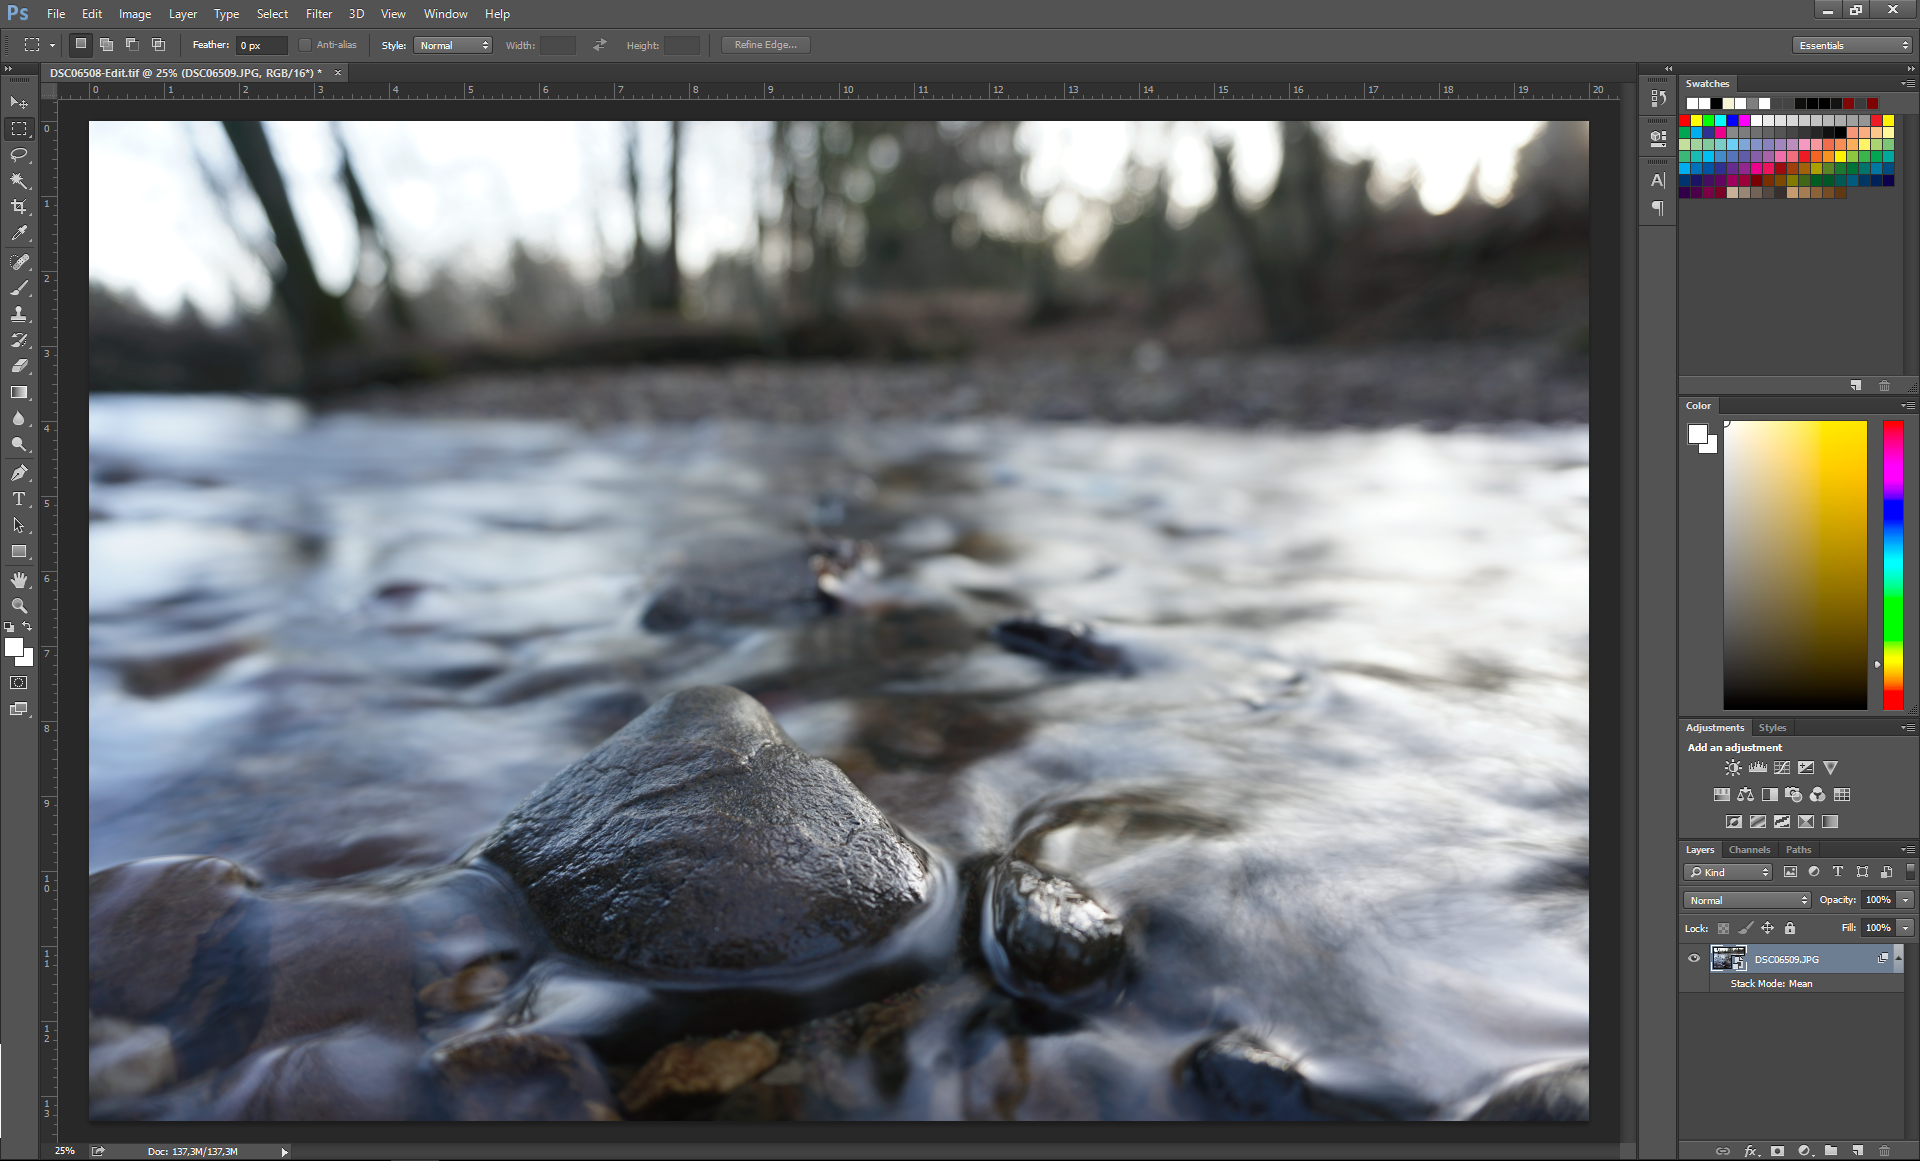
Then we’ll create a smart object from the images. We’ll do that by right-clicking the selected and now aligned layers and choose Convert to Smart Object. What this will do, is that it will create an object made of these several photos that the program will be able to apply certain modifications which will not destroy the original files.
Previously several layers are now all in one Smart Object
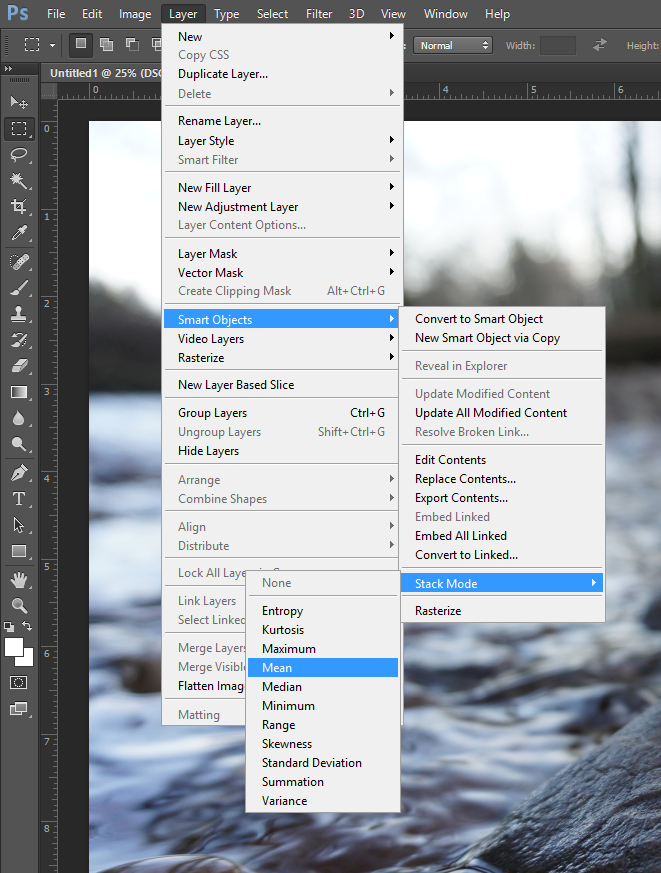
Photoshop has many features that can only be applied to Smart Objects. We’ll use one of them. We’ll have to average the photos we have selected and thus converted into a Smart Object. We will do this by selecting the Smart Object layer that we have just created and while selected navigate through Layer>Smart Objects>Stack Mode>Mean.
By doing this the computer will average out all the layers. This might take a lot of time. Feel free to grab some tea while your computer is doing the hard work. But when you come back, you will hopefully see a beautiful image on your screen.
If you need to do more tweaks while still in Photoshop, you can, but I suggest you switch to Lightroom, because if you want to work non-destructively the Stack alone may create a TIFF file that is bigger than 2 GB. At least that’s what has happened to me more than twice today. Another great think if working with Lightroom from the start is that you can just click Ctrl+S to save and it will save a Layered TIFF file inside the folder you have your images imported to, naming it with the first image of your selection appended with _Edit so that it doesn’t interfere wit other files, especially if they may be TIFF as well. Lightroom will, if still open, fetch it right into the same Import Catalog as you are working with in the same date folder (although it might be at the end of the “line”).

I did some more more adjustments in Lightroom (namely, converted it into BW and adjusted exposure a tad, also added some graduated filters on the bottom to add more depth) and then exported Picked images.
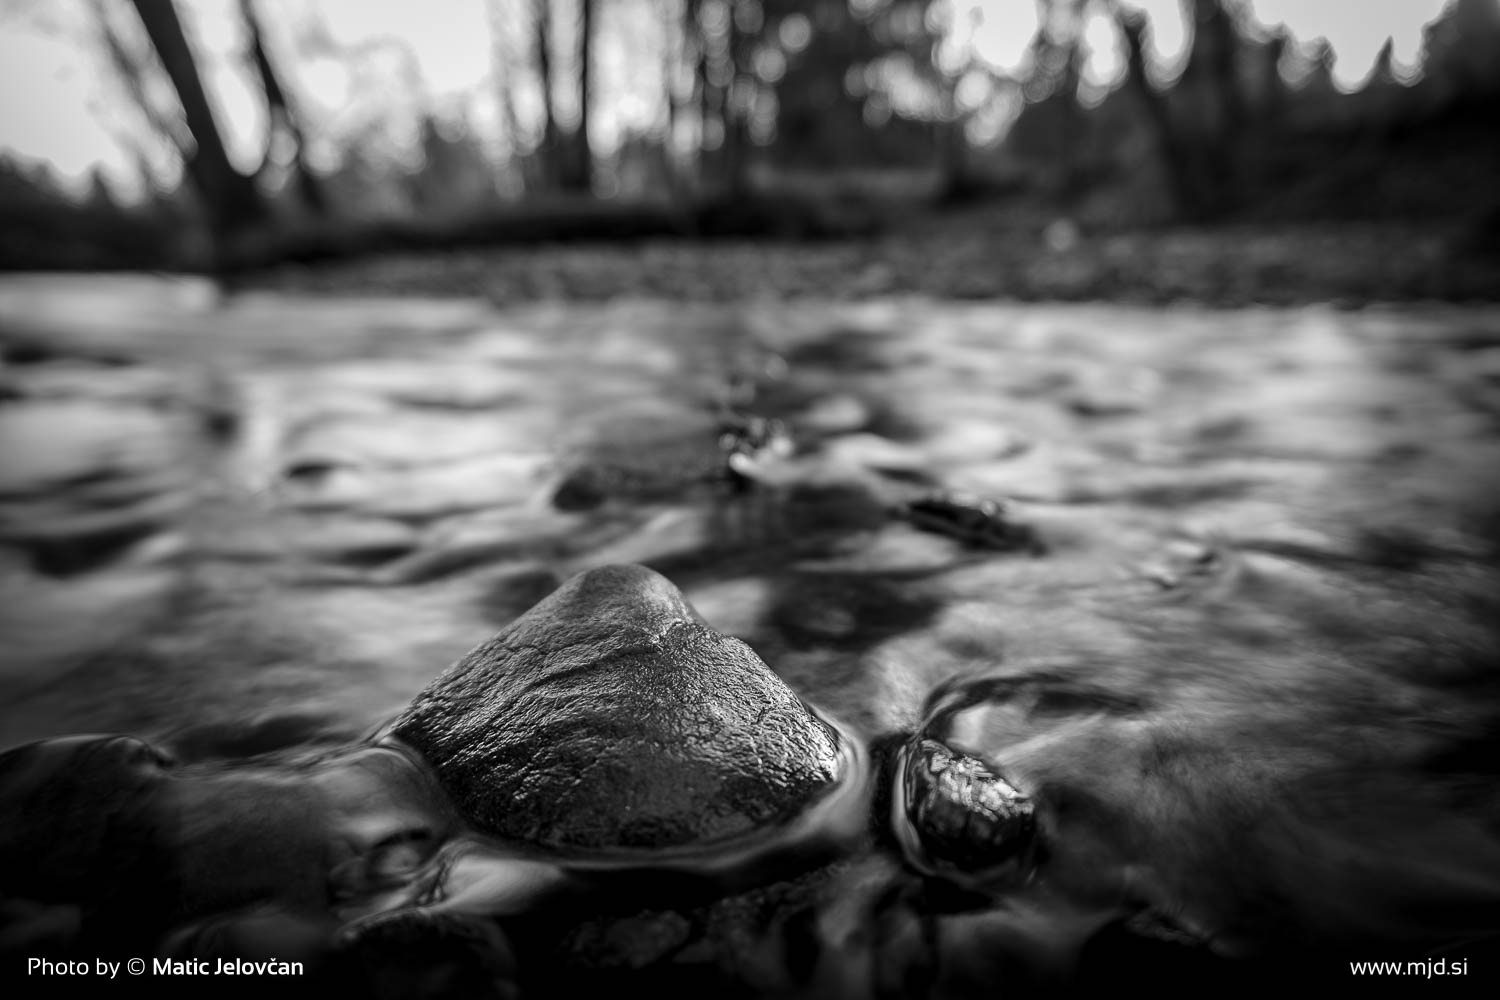
Here are some of those that came to life today by using long exposures; some of them “exposed” through Photoshop.


